A downloadable PDF version of this article is available here...
The moves in chess: table of contents
- Conventions used in this article
- The pieces used in chess
- The initial setup of the board
- The moves of the pieces
- Restrictions on the range of pieces
- Capturing enemy pieces
- Attacking the King
- The final two pieces: Knights and Pawns
- Castling: getting your King to safety
Conventions used in this article
Diagrams are seen from White's point of view, in that White is starting from the bottom of the diagram and playing upwards.
The text too is written from White's point of view: for example, in the section on castling I have said that the King moves to either g1 or c1. But if Black was castling then clearly the squares would be g8 or c8.
Same with ranks: when in the en passant section I talk about White's fifth rank, then the same would apply from Black's point of view (though in this case, Black's fifth rank would actually be squares a4-h4, just to make life confusing).
The pieces used in chess
Both players (known as "Black" and "White") have the same array of pieces at their disposal, with different pieces having different moves. Here are the various pieces, each player having…
 |
One King. The most important piece in your army; protect him at all costs. |
 |
One Queen. The most powerful piece on the board. |
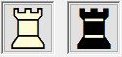 |
Two Rooks. The second most powerful pieces on the board. |
 |
Two Bishops. |
 |
Two Knights. |
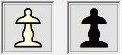 |
Eight pawns. The foot soldiers of your army. |
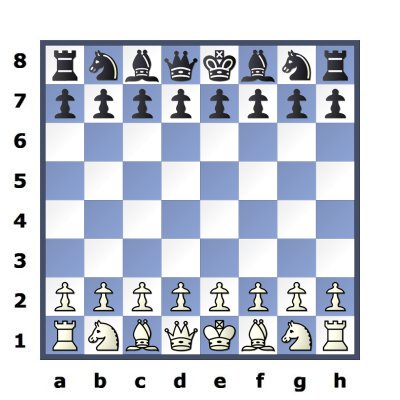
The initial setup of the board
- The bottom right hand square (h1) is always white
- White always moves first
- The Queens are on their own colour of square: the White Queen is on a white square (d1), and the Black Queen is on a black square (d8)
The moves of the pieces
The King: moves one square in any direction
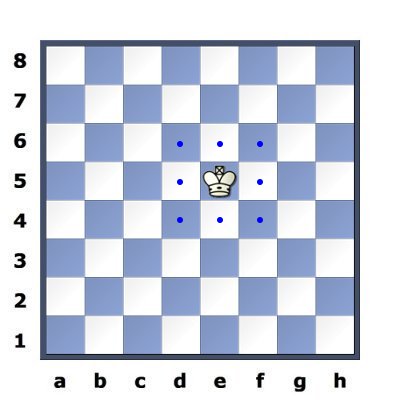
The Kings have the simplest moves: one square in any direction.
In this example, I have placed the White King on square e5, from where he could go to any one of the 8 squares next to him.
Please note that all pieces (except the pawns) can move backwards.
The Queen: moves any number of available squares in any direction
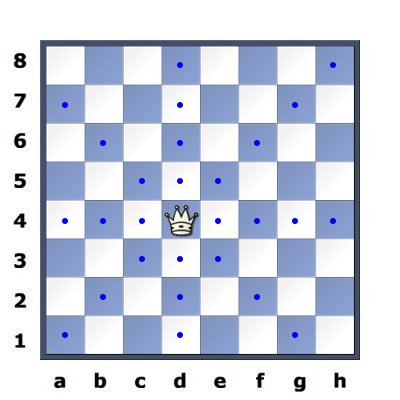
The Queens are the most mobile pieces of all, as they can move in a straight line in any direction – horizontally, vertically or diagonally – and as far as they want, always assuming nothing is in their way.
In this example, the White Queen on d4 has all those squares at her disposal.
The Rook: moves any number of available squares horizontally or vertically
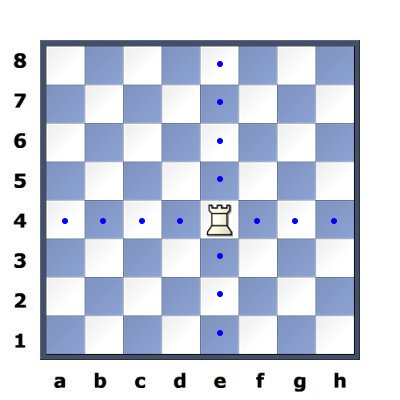
The rooks can move in a straight line either horizontally or vertically – but not diagonally – and as far as they want, always assuming nothing is in their way.
In this example, the White Rook on e4 has 14 squares that it can go to.
The Bishop: moves diagonally any number of available squares
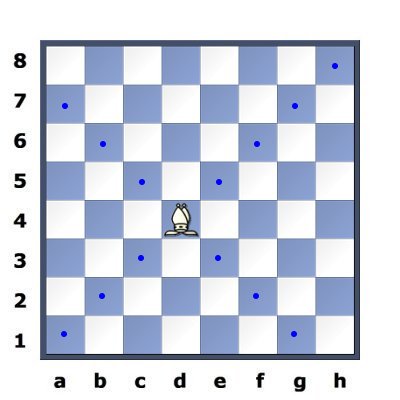
The bishops are confined to moving diagonally, but as far as they want (unless something is blocking their way).
Both sides have two bishops – one on a white square and one on a black square – and of course if a bishop starts off on a white square it will never leave the white squares. Similarly with black square bishops.
Restrictions on the range of pieces
We've looked at the King, the Queen, the Rook and the Bishop, and we're going to leave it at that for a while. The moves of knights and pawns are slightly more involved and we will deal with them later. In the meantime, here is the main restriction on the movement of the pieces.
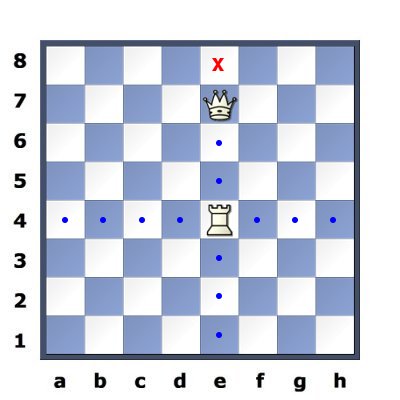
We saw before how the Rook can move horizontally or vertically, and for any number of available squares.
But in this example, the White Rook cannot move to e7, as it is occupied by the White Queen, and you can’t go displacing your own pieces.
In addition, the square e8 is not available to the Rook; the Rook's path to e8 is blocked by the Queen, and (with the exception of the knight) pieces cannot jump over other pieces.
Capturing enemy pieces
In draughts, pieces are captured by jumping over them. Not so in chess. In chess, pieces are captured by landing your own piece on the enemy square and then removing that captured piece from the board. Here is an example:

The Rook can move to any of the unoccupied dotted squares.
Alternatively, it has the option of capturing either the Bishop on b6 or the Knight on e2: the Rook would land on the square occupied by the Bishop, for example, and the Black Bishop would be taken off the board.
The Black Rook is outwith the range of the White Rook, and so in this position cannot be captured.
Attacking the King
Check

It is Black to move here, and his King is under attack from the White Rook. This situation is known as the King being "in check" from the Rook, or as the Rook checking the King.
Under the laws of chess, the King must immediately evade capture if at all possible, for example by moving out of the Rook's line of fire; any other move would be illegal. A corollary of this is that you must not expose your King to check; that would be an illegal move.
Checkmate
In this example the Black King is in check from the White Queen, and there is no way to avoid capture on the next move. This is checkmate, and the game is over. The game ends with checkmate when the King is in check but cannot avoid capture on the next move.
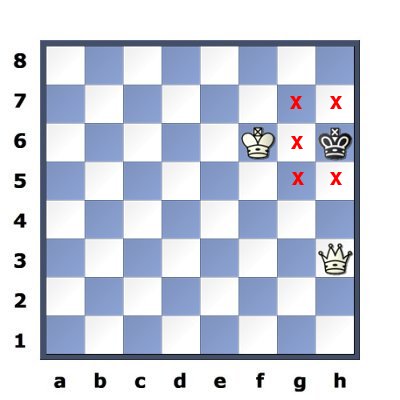
In general there are three ways to escape check:
- Getting out of the line of fire. This defence is not available as the king would only be moving to a square next to the opposing King, and this is illegal
- Interposing one of your pieces between your King and the piece attacking him. But Black has no more pieces left.
- Capturing the attacking piece (in this case the White Queen). Again this is impossible for Black. The verdict? Checkmate
Some thoughts on checkmate
Yes, the main object of the game is to checkmate your opponent's King – but remember that both sides have equal forces and that an immediate, crude attempt to attack the King will probably not be successful. Instead, most games follow the pattern of deploying your pieces as effectively as possible and trying to create weaknesses in your opponent's position. An important way of doing this is winning material: namely capturing one of your opponent's pieces without suffering an equal or greater loss in return.
In practice, most games do not end in checkmate; one side usually ends up feeling so weakened by loss of material that they accept defeat as inevitable and resign the game.
Another common way of ending a game is to agree a draw with your opponent, which might happen if neither side can make meaningful progress.
But checkmate remains the ultimate object of the game.
Stalemate
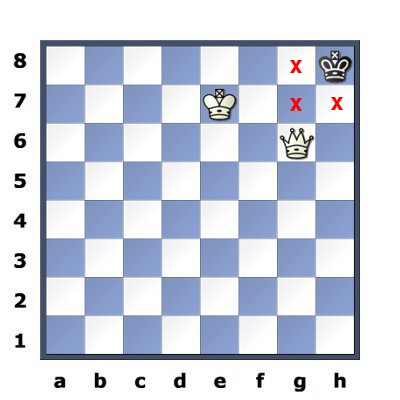
You might think that White has done well here: the Black King is trapped in the corner, and it will only be one more move before the White King comes to assist in the checkmate. In fact, White has blundered very badly. Black has no legal move but is not in check, and so the result is stalemate and the game is a draw.
In this example, Black is not in check from the White Queen, but that same Queen is preventing him from moving anywhere. Draw by stalemate.
The final two pieces: Knights and Pawns
The Knight's move
We have seen pieces which move in straight lines; but the Knight has a peculiar move which is "one straight and then one diagonally". Difficult to describe, and far better illustrated. Here it is.
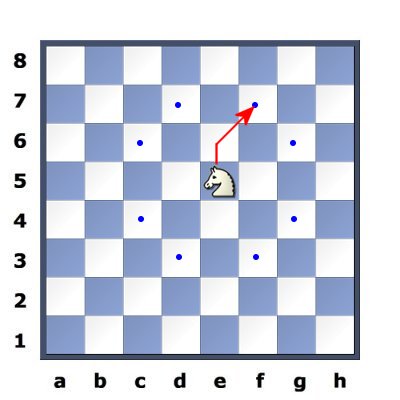
Some people see this as "two squares straight and then a 90 degree turn for one square". It comes to the same thing, and how you visualise it is up to you.
The Knight also has a unique capability, which we'll see in the next section.
Knights can jump over other pieces
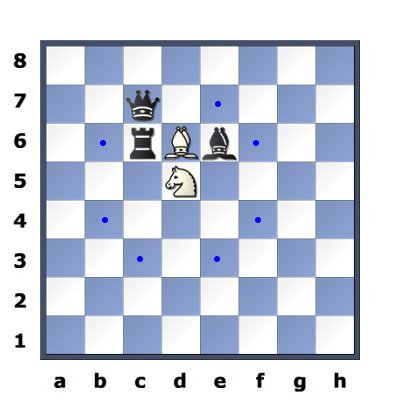
Uniquely, the Knight can jump over other pieces; but it has no effect whatsoever on those pieces.
In this diagram, the Knight:
- Can capture the Queen on c7
- Cannot capture the Black Rook or the Black Bishop
- Can jump to any of the dotted squares without affecting any of the other pieces
Pawns move forward one square at a time
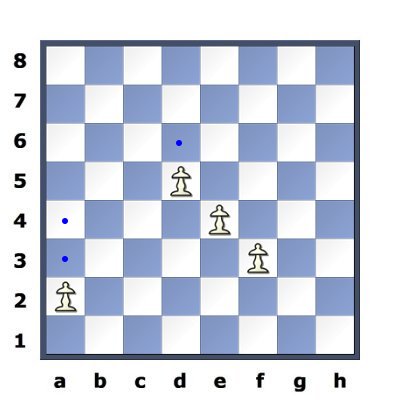
This is not completely true; on its first move – and its first move only – a pawn has the option of moving two squares forward rather than one.
In this example:
- The pawn on d5 can move to d6 (dotted)
- The pawn on e4 can move to e5
- The pawn on f3 can move to f4
- The pawn on a2 is on its initial square, and so it can move to either a3 or a4
- It can move to a3 if that square is unoccupied
- It can move to a4 if both a3 and a4 are unoccupied
Pawns capture diagonally
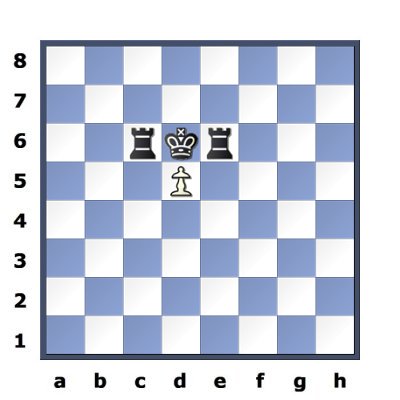
Pawns do not capture pieces directly in their path, but pieces one square diagonally forward of them.
In this diagram, the Black King is not in check (i.e. under attack) from the pawn, and the pawn cannot proceed to the square occupied by the King. However, the pawn can capture either of the two Rooks as they are diagonally forward of the Pawn.
Promotion
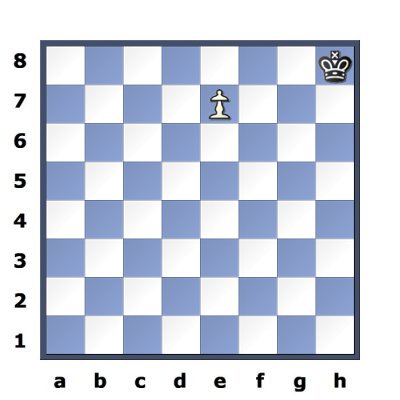
As Pawns are the only pieces which cannnot move backwards, what happens to them when they reach the other side of the board? Well, the good news for a Pawn is that if it does achieve this feat it is replaced by one of the more powerful pieces: Queen, Rook, Bishop or Knight. You cannot promote the pawn to a King, or leave it as a pawn.
You are not restricted to replacing it with a piece that has already been captured; if promotion gives you a second (or a third…) Queen, then that's fine.
You would almost always choose to take another Queen, the most powerful piece on the board.
In this example the pawn can move to the e8 square, promoting itself to a Queen (and thus checking the enemy King for good measure).
En passant: a strange way of capturing
Many centuries ago (somewhere between 500 and 800 years ago) it was found that a lot of games were fizzling out by the pawns being locked together so that neither side could make much progress, and so the en passant rule was introduced. It's not something that comes up in every game, but you do need to be aware of the rule. Again, it is better illustrated than explained, so here we go. But first of all, please remember that pawns have the option of moving two squares on their initial move.
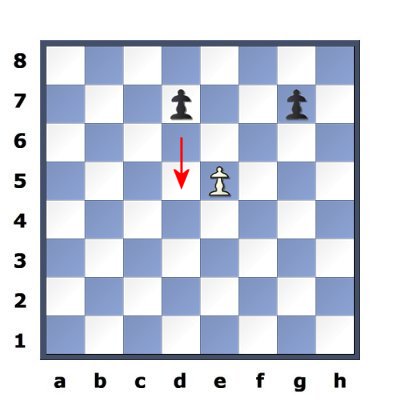
White has a pawn on his fifth rank (the horizontal rows 1-8 of a board are known as “ranks”) and Black has spotted that if he moves his d7 pawn one square to d6 it can be captured. Can the Black pawn evade capture by moving to d5? Nice try, but the answer is no.
If you have a pawn on your fifth rank, and an opposing pawn then moves two squares to be right alongside it, you can on your next move only capture it exactly as if it had only moved one square. In this example, the White pawn would move to d6 (not d5) and the Black pawn on d5 would be removed from the board.
Please note that this only applies to pawns on a file (files are the vertical rows a-h) right next to your own pawn. In this diagram, the pawn on g7 could quite safely move two squares; it could not be captured by White's e5 pawn.
Castling: getting your King to safety
The last move we'll be looking at is called Castling, and is a way of putting your King in a safer place. What happens is that the King moves TWO squares either to the square g1 or to the square c1, and then the Rook comes round the back of it to create a small fortress. Note that you can castle only once in a game, since one of the conditions is that you can only castle if neither the King nor the Rook involved in the operation have moved previously.
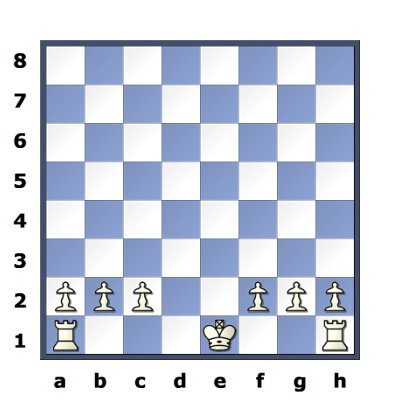
The White King can castle on the Kingside of the board, when it would go to g1 and then bring the Rook round it to f1. This is all achieved as ONE move.
The squares between the King and the Rook involved must be unoccupied.
In this instance, White can also castle on the Queenside, by moving his King to c1 and then bringing the Rook round the back of it to d1.
The result of castling is in the next section.
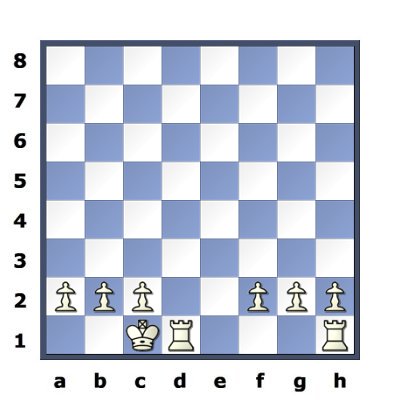
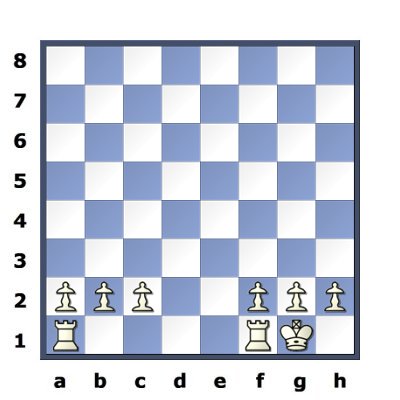
Position after castling
The left hand diagram shows the position after Queenside castling, and on the right hand side we have the result of Kingside castling.
PS Always move the King first when you're castling – not the Rook. Castling is technically a move of the King and if you touch your Rook first, your opponent may think you were intending to move only the Rook.
Restrictions on castling
We already know that you can castle only once, as castling must be performed by a King and a Rook, neither of which have moved previously. Here are other restrictions on castling.
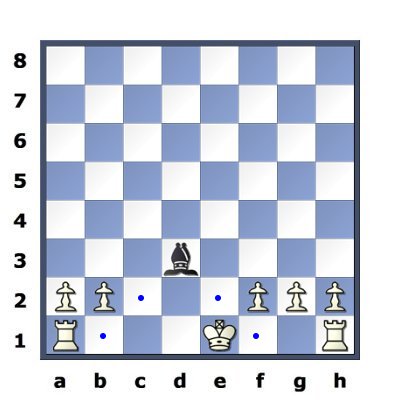
- All squares between the King and the Rook involved must be free of pieces
- You cannot castle to escape check
- The king cannot move to a square – or even through a square - which is under attack. In this example, the king cannot castle Kingside, as the square f1 is under attack…
- BUT… castling on the Queenside would be quite legal. OK the bishop is attacking b1, but the King is only going as far as c1, and it is not illegal for the Rook to move through a square under attack
D W Bogle: 01 Sep 2024